

Lets get into the details of how I turned THIS $79 Ikea play kitchen…

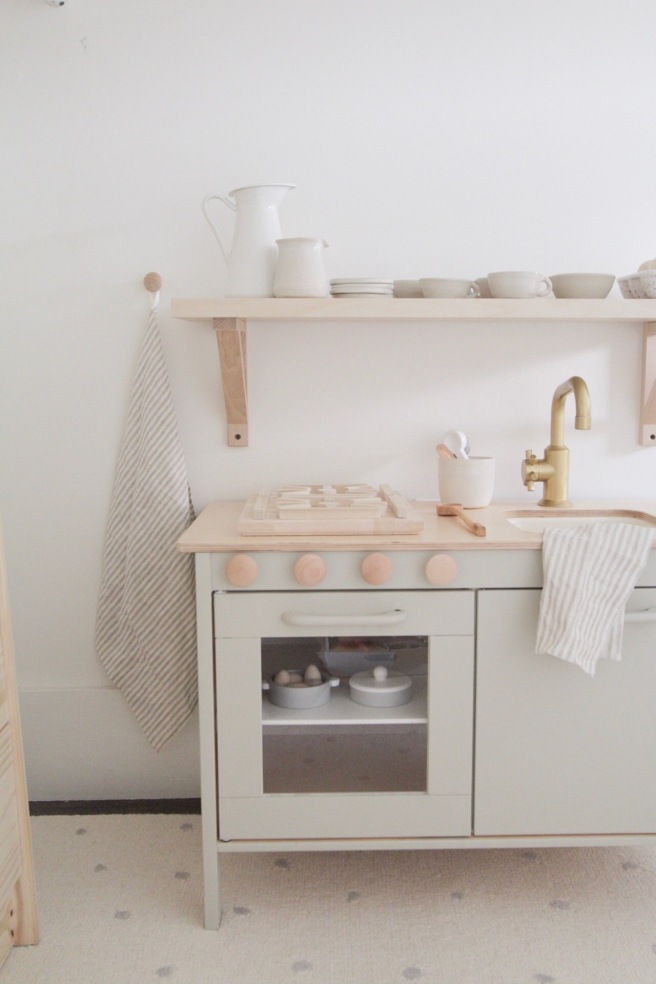
Into this beauty…
Supply List: (clickable links)
Ikea Kitchen
Paint: farrow and ball Bone. we color matched this to sherwin williams paint at Lowes.
Paint: Rustoleum Heirloom white spray paint
Paint: Rustoleum Metallic Gold spray paint
4 Round wood knobs
2 Wood handles : It’s important the handles you choose to replace the ikea ones are 5″ center to center.
12″ x 9″ wood plaque board: Also found at Michaels craft store.
Ikea shelf and Brackets
quantity of 2: 1/2 inch square wood dowels
quantity of 1: 1 inch width round dowel
Tools used:
mitre saw
sandpaper
hot glue gun and glue stick
small paint roller
blue painters tape
measuring tape
screw gun with philips head
drill bit
Lets start with the stovetop!

Cut list: this list will supply enough cuts to complete the 2 grills.
8 cuts at 5″ of the 1/2″ square dowel : this is the 4 long pieces framing each grill
2 cuts at 1/2″ of the 1″ round wood dowel : this is the center circle
12 cuts of 1 3/4’s” of the 1/2″ square dowel: this is the 6 angled pieces in each grill
4 cuts of 1 1/2″ of the 1/2′ square dowel: this is the 2 slightly smaller vertical pieces inside each grill.
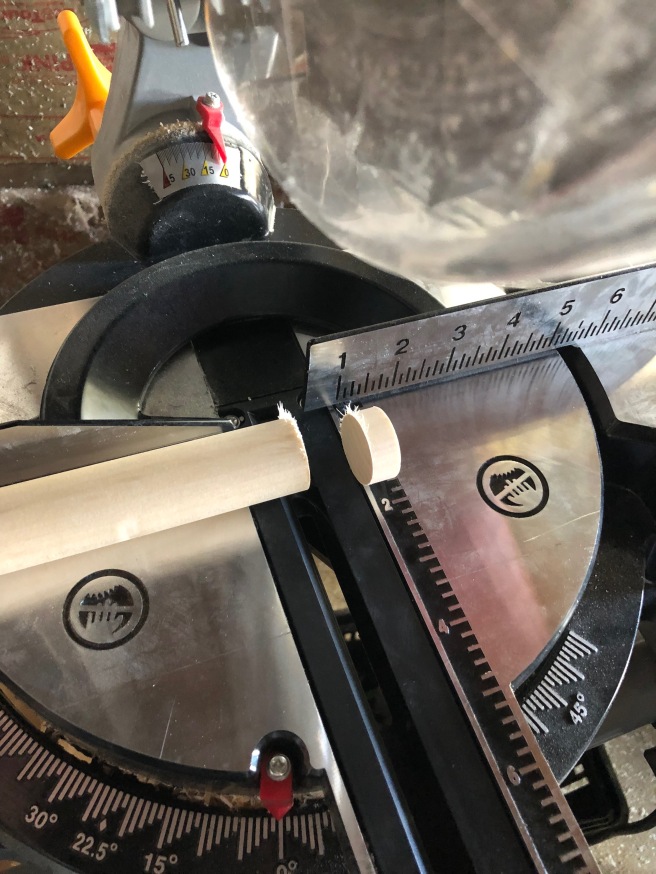

Lay out your cuts onto the plaque board to ensure a proper fit and then sand all the rough edges until smooth.

once smooth, you can hot glue the dowels onto the 9×12″ wood plaque in the above pattern,

Next, Get building the kitchen!
Unpack all the pieces and build the main walls using the Ikea instructions.
once you get here, tape off the inside edges and middle if you don’t plan on painting the inside.

mount the faucet to a piece of cardboard to keep it upright while spray painting. otherwise, it doesn’t stand up on its own and will smear your wet paint if it falls.
spray paint the sink Heirloom white on a piece of cardboard.


The main body of the kitchen is too smooth, I gave it a light sand before painting.

Tape off the oven glass and give the whole kitchen a couple coats of paint. I kept the countertop the existing wood and did not paint it.

once it was all painted and dried, I lined up the wood knobs and used a drill bit to pre drill a hole. Leaving the wood top off, I screwed them in from the back and didn’t tighten them down all the way to ensure the knobs would twist.

Then, install oven doors per Ikea instructions.
Assemble the countertop (not assembling the countertop to the main kitchen yet but just installing the countertop accessories).
Mount the faucet with the provided screws.
Hot glue the plaque board stove top over the stove hole on top of the countertop.
To give it a cleaner look, I under mounted the sink by screwing it up from the bottom of the countertop. Be sure to use the tiny screws provided for the sink or you risk screwing through the top of the countertop.
(The next image shows the countertop installed without the wood knobs, disregard that. I just had the countertop resting on top before taking it back off to install the knobs)

My original thought was to keep these new handles the natural wood but they didn’t match with the circular oven knobs or countertop so I ended up painting them the same Bone color once installed.
Note that these new handles aren’t as wide as the old ones to cover the holes provided for install. If you look closely at my finished pictures, you’ll see a small gap. I’ll wood putty and paint this in the future.

once you get it to this point you can install the countertop onto the body of the kitchen per Ikea instructions and DONE!
The countertops will have a couple of little holes to accommodate for the little shelf and microwave attachment that the kitchen comes with but I opted for a shelf that better displays the little pottery I made for my girls and didn’t end up using the microwave shelf.
If you do go with the shelf I opted for (linked in the supply list at the top!) make sure to install it into a stud in the wall!


A couple of notes on where I sourced all the cute little accessories:
The tea towels I made from a striped linen fabric and hooked with an extra round knob.
I whittled the wood spoon and made most of the ceramics.
The white pitcher on the far left is ikea: pitcher
The speckled ceramic egg tray is from Etsy ceramicist Muddyme: egg tray
The wood eggs were found on amazon: wood eggs
The tiny pot and pan set is from Scandiborn: pots and pans
If you have any other questions, don’t hesitate to send them my way!
Luvs, Lindy

Hi Lindy, this is gorgeous! how much paint did you need for the kitchen? And did you just do one coat? Thanks! Grace
LikeLike
Hi grace! I had a gallon leftover from another project but you would have plenty with a quart size. I did 2-3 coats and that was with sanding. The ikea kitchen material is kind of a slippery surface in some areas. I didn’t have a problem with the paint sticking but it did require more than one coat.
LikeLike
Hi, I love the colour you have done for the kitchen? Do you think there is a chance of me getting that colour at Bunnings? Any advice or help on getting that would be appreciated 🙂
LikeLike
What was the name of the paint from Lowe’s and also the link to the shelf doesn’t go anyway. Do they not sell that shelf anymore?
Thank you.
LikeLike
Hi Lindy, you mentioned you colour matched at Lowes. Would you be able to share the exact colours from Lowes (hard to colour match during isolation times)? It would be greatly appreciated 🙂 Beautiful kitchen
LikeLike
I color matched Sherwin Williams paint at Lowe’s to Farrow and Ball Bone for the kitchen. They have it in their computer system. ❤️
LikeLike